
Fender Stratocaster Setup PDF: A Comprehensive Guide
This detailed PDF guide provides a complete walkthrough for setting up your Fender Stratocaster, covering truss rod adjustments, action, and intonation.
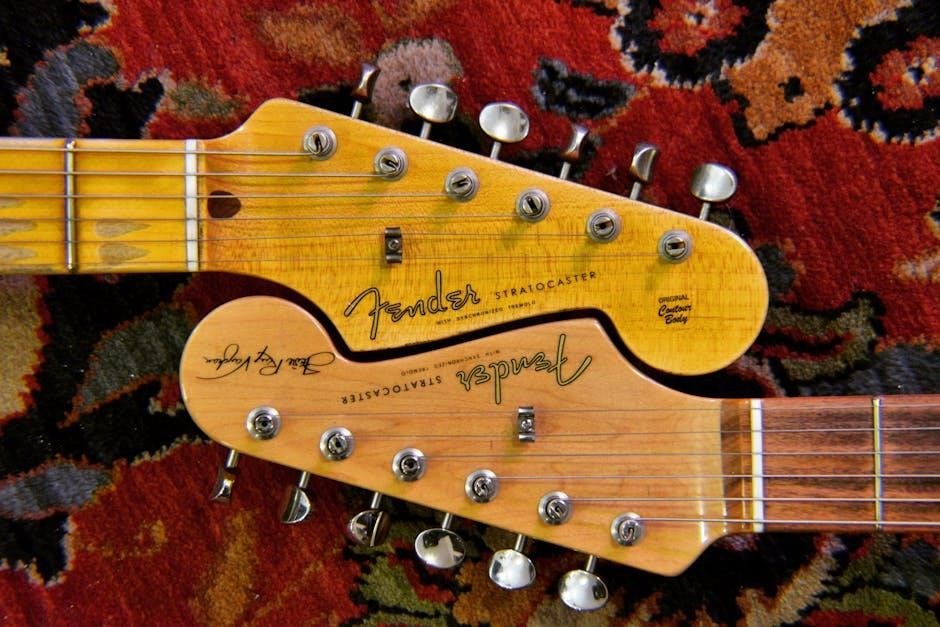
The Fender Stratocaster, born in 1954, stands as an iconic symbol of rock and roll, celebrated for its versatile sound and comfortable design. This guide focuses on optimizing its performance through a meticulous setup process. Understanding the Stratocaster’s components – its tremolo system, single-coil pickups, and bolt-on neck – is crucial for effective adjustments.
Whether you’re a seasoned guitarist or a beginner, a properly set up Stratocaster enhances playability and unlocks its full tonal potential. This PDF will navigate you through each step, ensuring your instrument responds accurately to your playing style. From adjusting neck relief to fine-tuning intonation, we’ll cover everything needed for a professional-quality setup.
Why a Proper Setup is Crucial
A correctly executed setup dramatically improves a Fender Stratocaster’s playability and sound. Incorrect setups lead to buzzing strings, intonation issues, and discomfort, hindering your musical expression. Environmental factors like humidity and temperature changes constantly affect the instrument, necessitating periodic adjustments.
A professional setup ensures optimal string action, minimizing fatigue and maximizing speed. Precise intonation guarantees accurate notes across the fretboard, vital for harmonic playing. Furthermore, a well-adjusted tremolo system maintains tuning stability, even with aggressive use. This PDF guide empowers you to perform these adjustments, saving money and fostering a deeper connection with your Stratocaster.

Essential Tools for Stratocaster Setup
Successful Stratocaster setups require specific tools: screwdrivers, a string winder, a truss rod wrench, action gauges, and radius gauges for precision adjustments.
Screwdriver Set (Metric & Imperial)
A comprehensive screwdriver set is paramount for Stratocaster setups, as Fender utilizes both metric and imperial fasteners throughout the instrument. Having both types readily available prevents frustrating delays and potential damage from using the incorrect size. Invest in a high-quality set with various head types – Phillips, slotted, and potentially Torx – to address all adjustment points.
Specifically, you’ll need screwdrivers for adjusting pickup heights, bridge saddles, control knobs, and the neck plate. Magnetic tips are incredibly helpful for retrieving dropped screws within the guitar’s cavity. Ensure the screwdriver tips fit snugly into the screw heads to avoid stripping, which can necessitate professional repair. A well-organized set will significantly streamline the setup process.
String Winder & Cutters
A string winder is an indispensable tool for efficient string changes on your Stratocaster, drastically reducing the time and effort required. Opt for a winder with a crank handle and a bridge pin puller for added versatility. Integrated string cutters are exceptionally convenient, allowing you to trim excess string length cleanly after winding.
Sharp cutters are crucial to prevent fraying and ensure a neat appearance. Avoid using wire cutters, as they can damage the strings and potentially leave metal fragments. A combined winder/cutter tool is a space-saving solution. Remember to wind the strings neatly around the tuning pegs to maintain tuning stability and prevent slippage during play.
Truss Rod Wrench
The truss rod wrench is arguably the most critical tool for a Stratocaster setup, enabling adjustments to the neck’s relief. Fender typically uses a ¼” hex wrench for most Stratocasters, but some older or custom models may require different sizes. Ensure you have the correct size to avoid damaging the truss rod nut.
A properly fitting wrench is essential; a loose fit can strip the nut. Adjustments should be made incrementally – small turns are key. Always loosen strings before adjusting the truss rod to reduce tension and prevent breakage. Document your adjustments to track changes and return to a previous setting if needed.
Action Gauge & Radius Gauge
An action gauge precisely measures the string height above the frets, crucial for comfortable playability and minimizing buzzing. Radius gauges determine the curvature of the fretboard, typically 7.25”, 9.5”, or 12” on Stratocasters. Matching the saddle radius to the fretboard radius optimizes string contact and intonation.
Using these gauges ensures consistent action across all strings and positions. Low action facilitates faster playing, while higher action reduces fret buzz. A radius gauge helps when shimming saddles or filing them to match the fretboard’s curve. Accurate measurements are vital for a professional setup, enhancing the instrument’s overall performance.

Step-by-Step Stratocaster Setup Guide
This section details a systematic approach to Stratocaster setup, including neck relief, action, intonation, tremolo, and pickup adjustments for optimal playability.
Neck Relief Adjustment (Truss Rod)
Adjusting the truss rod controls the neck’s curvature, crucial for comfortable playing and preventing buzzing. Too much relief causes a “U” shape, while too little creates a backbow. Begin by loosening the strings to reduce tension. Locate the truss rod access, typically at the headstock or heel.
Using the correct wrench, make small, incremental adjustments – clockwise tightens, counterclockwise loosens. After each adjustment, retune the strings and check the relief. Measure relief at the 7th or 8th fret, observing the gap between the string and the fret. Aim for a slight concave curve; a typical starting point is around .010 inches. Patience is key; avoid drastic changes!
Understanding Neck Relief
Neck relief refers to the amount of bow, or curvature, in the guitar neck. It’s not about making the neck perfectly straight; a slight amount of relief is essential. This allows the strings to vibrate freely without buzzing against the frets. Too much relief makes the action high and difficult to play, while too little can cause fret buzz, especially in the lower frets.
Environmental factors like temperature and humidity significantly impact neck relief. Wood expands and contracts, altering the neck’s shape. Therefore, regular checks and adjustments are necessary. Understanding how your neck responds to changes is vital for maintaining optimal playability. A properly set neck relief is the foundation of a good setup.
Adjusting the Truss Rod – Clockwise vs. Counterclockwise
The truss rod is a metal rod inside the neck that controls its curvature. Adjusting it requires a specialized wrench. Turning the wrench clockwise tightens the truss rod, reducing neck relief – straightening the neck. This is typically done to combat excessive relief or fret buzz. Conversely, turning it counterclockwise loosens the truss rod, increasing neck relief – adding more bow to the neck.
Small adjustments are crucial! Quarter-turn increments are recommended, followed by a period to allow the neck to settle. Over-tightening can damage the truss rod or neck. Always observe the neck for changes after each adjustment. Patience and careful observation are key to achieving the desired relief.
Saddle Height Adjustment (Action)
Adjusting saddle height directly impacts the string action – the distance between the strings and the frets. Lower action makes playing easier but can cause fret buzz if too low. Higher action requires more effort but minimizes buzzing. Each string’s saddle height is individually adjustable via small screws. Raising a saddle increases action, while lowering it decreases action.
Start by setting a baseline action height, typically between 2.0mm and 2.5mm for the low E string and 1.6mm to 2.0mm for the high E string. Fine-tune each saddle to achieve comfortable playability across the entire fretboard, minimizing buzz and maximizing tone.
Setting String Action at the Bridge
To set the string action at the bridge, use a precise action gauge or a ruler to measure the distance between the bottom of the string and the top of the 12th fret. Begin with the low E string, adjusting its corresponding saddle height screw. Turn clockwise to raise the saddle and increase action, counterclockwise to lower it and decrease action.
Repeat this process for each string, aiming for the desired action height. Regularly check for fret buzz as you adjust. Remember, slight adjustments can make a significant difference. Consistent and incremental changes are key to achieving optimal playability and a comfortable playing experience.
Measuring String Height
Accurate string height measurement is crucial for a proper Stratocaster setup. Use an action gauge, readily available online or in music stores, for precise readings. Alternatively, a precise ruler with millimeter markings will suffice. Measure from the bottom of the string to the top of the 12th fret.

Standard factory settings typically range from 2.0mm to 2.4mm on the high E string and 2.4mm to 2.8mm on the low E string. These are starting points; adjust to your playing preference. Consistent measurements across all strings ensure balanced playability and prevent buzzing or choking.
Intonation Adjustment
Proper intonation ensures your Stratocaster plays in tune across the entire fretboard. Intonation refers to the accuracy of a note played at any fret compared to the open string. If the guitar plays in tune open but is sharp or flat higher up the neck, intonation adjustment is needed.
Use a tuner to check the pitch at the 12th fret. Compare it to the open string pitch. If sharp, lengthen the string by moving the saddle away from the neck. If flat, shorten it by moving the saddle towards the neck. Repeat until accurate tuning is achieved at the 12th fret.
What is Intonation?
Intonation, in the context of a Fender Stratocaster, is the accuracy of pitch as you move up the neck. Ideally, a fretted note should be exactly the same pitch as its harmonic equivalent. Poor intonation means notes are sharp or flat as you play higher on the fretboard, even with correct tuning.
It’s not about tuning the open strings; it’s about ensuring the guitar plays in tune everywhere. Factors like string gauge, saddle position, and neck relief all influence intonation. Correct intonation is crucial for a pleasant and harmonically accurate playing experience, making chords and melodies sound their best.
Adjusting Saddle Position for Correct Intonation
To adjust intonation on a Fender Stratocaster, locate the intonation screws on each saddle at the bridge. Compare the pitch of the fretted note at the 12th fret to the harmonic at the same fret. If the fretted note is sharp, lengthen the string by moving the saddle away from the neck.
Conversely, if it’s flat, shorten the string by moving the saddle towards the neck. Make small adjustments and re-check frequently. Use a tuner for precise measurements. Repeat this process for each string until all notes are accurately intonated, ensuring harmonious playing across the entire fretboard.
Tremolo System Setup
The Stratocaster’s tremolo system requires careful setup for optimal performance. Decide between a ‘floating’ tremolo, offering wider pitch bending, or a ‘decked’ tremolo, providing greater tuning stability. Adjust spring tension in the tremolo cavity to balance string tension.
More spring tension raises the tremolo block, while less lowers it. Ensure the bridge baseplate sits flat against the body. Proper spring claw screw adjustment is crucial. Fine-tune until the tremolo returns to pitch smoothly after use, maintaining consistent tuning throughout playing sessions.
Floating vs. Decked Tremolo
A floating tremolo allows for up-bending pitch control, creating vibrato and dive-bomb effects, but can be less stable with aggressive playing. It requires precise balancing of string tension and spring force. A decked tremolo sits flush against the body, enhancing tuning stability and sustain.
This setup limits up-bending but is ideal for players prioritizing consistent pitch. Choosing between the two depends on your playing style and desired effects. Floating tremolos demand more frequent adjustments, while decked tremolos offer a more ‘set it and forget it’ experience. Consider your needs carefully!

Tremolo Spring Tension Adjustment
Adjusting tremolo spring tension is crucial for proper tremolo function and tuning stability. Loosening the springs lowers the bridge, decreasing tension, while tightening them raises the bridge, increasing tension. This balance affects how easily the tremolo arm bends and returns to pitch.
Start with all springs equally tensioned. Fine-tune by adding or removing half a turn at a time, checking the bridge’s resting position. A balanced tremolo will return to pitch smoothly. Incorrect tension can cause tuning issues or limit the tremolo’s range. Regular adjustments are key!
Pickup Height Adjustment
Optimizing pickup height significantly impacts your Stratocaster’s tone and output. Lowering pickups reduces output and brightens the sound, while raising them increases output and adds warmth, potentially introducing muddiness. Start with manufacturer recommendations as a baseline.
Adjust each pickup individually, listening for a balanced volume across all positions. Use a screwdriver to carefully raise or lower the pickup polescrews. Experiment with small adjustments, listening for changes in tone and sustain; Balancing pickup volumes ensures consistent output when switching between pickups, enhancing playability and sonic clarity.

Optimizing Pickup Height for Tone
Achieving the ideal tone hinges on precise pickup height adjustments. For a brighter, more articulate sound, lower the pickups slightly, reducing magnetic pull on the strings. Conversely, raising pickups increases output and warmth, ideal for rock or blues. However, excessive height can cause string buzzing and intonation issues.
Experimentation is key! Start with factory settings and make small adjustments, listening critically for changes. Consider your playing style; aggressive players may prefer higher pickups for increased sustain, while those seeking clarity might opt for lower settings. Balance is crucial – aim for a consistent tone across all pickups.
Balancing Pickup Volumes
Uneven pickup volumes are common, especially on Stratocasters. To balance them, use a small screwdriver to carefully adjust the pole pieces on each pickup – raising a pole piece decreases volume, while lowering it increases it. Alternatively, some Stratocasters feature trim pots on the back of the volume controls for finer adjustments.
The goal is a consistent output level across all pickup selections. Play through various combinations (neck, middle, bridge, and combinations) and listen critically. Aim for a smooth transition in volume as you switch pickups, avoiding drastic jumps. This ensures a balanced and professional sound, enhancing your overall playing experience.

Advanced Stratocaster Setup Considerations
Beyond basic setup, factors like string gauge, nut slot depth, and fret condition significantly impact playability and tone, often requiring professional attention.
String Gauge and its Impact
Selecting the correct string gauge is crucial for optimal Stratocaster performance and setup stability. Lighter gauges (e.g., .009-.042) offer easier bending and reduced tension, ideal for blues and lead playing, but can exhibit fret buzz and intonation issues. Heavier gauges (e.g., .010-.046 or .011-.048) provide fuller tone, improved sustain, and better tuning stability, particularly for drop tunings or aggressive styles.
However, heavier strings require more finger strength and may necessitate truss rod adjustments to counteract increased neck relief. Changing string gauge significantly impacts intonation, requiring saddle adjustments to ensure accurate pitch across the fretboard. A PDF setup guide should detail how to compensate for gauge changes, emphasizing the interplay between string tension, neck relief, and intonation for a balanced and playable instrument.
Nut Slot Depth and String Spacing
The nut is a critical component often overlooked in Stratocaster setups. Incorrect slot depth causes tuning instability, buzzing, and difficulty playing open chords. Slots too deep result in strings rattling, while slots too shallow create excessive string tension and intonation problems. A comprehensive PDF guide should illustrate how to check slot depth using feeler gauges and identify necessary adjustments.
Proper string spacing at the nut is equally important for comfortable playing and accurate intonation. Variations from factory specifications can lead to fingerboard reach issues and string-bending difficulties. The guide should explain how to assess string spacing and, if needed, recommend professional nut modification or replacement to ensure optimal playability and tonal clarity.
Fret Leveling and Crowning (Professional Service)
While many Stratocaster setup tasks are DIY-friendly, fret leveling and crowning are best left to experienced luthiers. Uneven frets cause buzzing, dead spots, and intonation issues, hindering optimal performance. A detailed PDF guide should clearly state this is not a beginner repair.
Fret leveling involves precisely filing down high frets to create a uniform playing surface. Crowning restores the rounded profile of each fret after leveling, ensuring comfortable playability and accurate intonation. The guide should emphasize the specialized tools and skills required, advising readers to seek professional assistance for these critical adjustments to avoid damaging their instrument.

Resources & PDF Guides
Explore official Fender setup guides and numerous third-party PDFs for detailed Stratocaster setup instructions, alongside helpful online video tutorials.
Official Fender Stratocaster Setup Guides
Fender provides valuable resources directly on their website, offering official setup guides tailored specifically for Stratocaster models. These guides often include detailed diagrams and step-by-step instructions covering essential adjustments like truss rod manipulation, string action height, and intonation settings. Accessing these resources ensures you’re following manufacturer-approved procedures, safeguarding your instrument’s integrity.
While comprehensive, these guides may sometimes require a foundational understanding of guitar mechanics. Fender’s support section also features frequently asked questions and troubleshooting tips. Regularly checking Fender’s official channels is recommended, as they occasionally update their documentation to reflect changes in Stratocaster designs or best practices. These resources are a great starting point for any Stratocaster owner.
Third-Party Stratocaster Setup PDFs
Beyond Fender’s official documentation, numerous experienced luthiers and guitar technicians have created detailed Stratocaster setup PDFs available online. These resources often present alternative approaches and expanded explanations, catering to various skill levels. Websites dedicated to guitar maintenance frequently host these guides, offering diverse perspectives on achieving optimal playability.
However, exercise caution when utilizing third-party PDFs; verify the author’s credentials and cross-reference information with official sources. Some guides may focus on specific modifications or preferences. Look for PDFs with clear illustrations and detailed explanations of each adjustment. These supplemental resources can be invaluable for deepening your understanding of Stratocaster setup, complementing Fender’s official guides.
Online Video Tutorials for Stratocaster Setup
Visual learners often benefit from online video tutorials demonstrating Stratocaster setup procedures. Platforms like YouTube host a wealth of content, ranging from beginner-friendly introductions to advanced techniques. These videos allow you to observe each adjustment in real-time, enhancing comprehension and reducing the risk of errors.
Search for reputable channels featuring experienced guitar technicians. Look for tutorials that clearly explain the “why” behind each step, not just the “how.” Many videos correlate with PDF guides, offering a combined learning experience. Remember to pause and rewind as needed, and always prioritize safety when working with tools. Supplementing PDF guides with video tutorials can significantly improve your setup skills.